Tip 1: How to Tint the Bumper
Tip 1: How to Tint the Bumper
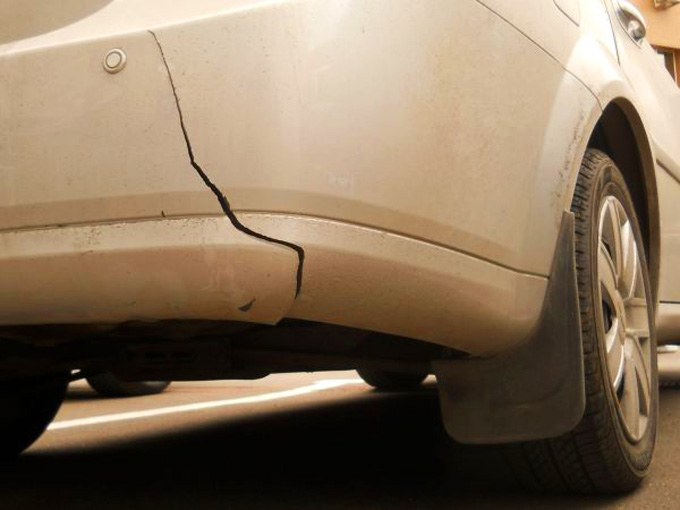
Scratches appear after minor accidents, from suddenjumping on a cat's car, damage to the surface can and accidentally struck a tree branch. To get rid of minor damage, it is not necessary to completely replace bumper, Because it is enough to apply the paint correctly to a problematic place, and the machine will again get its original appearance.

You will need
- - detergent;
- - a small knife;
- - a grinding skins;
- - solvent;
- - primer;
- - special gun or syringe for applying paint;
- - wet wipe;
- - paint;
- - varnish.
Instructions
1
Prepare the part you need bumpera. Remove dust and dirt from scratches and rinse it with any detergent or usual detergent.
2
Gently clean the damage from the peeling paint with a knife. After that, sand a scratch with a special skin. Once the surface bumperBut becomes dull, wipe it with a special degreasing solvent in order to remove residual tar.
3
Cover the scratched part bumperBut with two coats of a primer. To facilitate the procedure, it is best to use a special gun. At first, apply evenly one coat, let it dry, and then repeat the procedure.
4
Wait until the soil thoroughly dries, usually it takes about two days. Treat the primer with special sandpaper to eliminate defects and irregularities on the surface. bumpere. Just do not overdo it, otherwise you will wipe it all to the ground. After you polish the primer, thoroughly blow it and degrease it.
5
Before applying the paint, wipe the surface with a slightly damp cloth. Tint bumper Can be done with a simple small brush, orA special tool in the form of a syringe. Spread the paint in a thin even layer and wait about twenty minutes for it to dry. After that, gently repaint the paint and wait until it dries. If the resulting result does not suit you, then you can apply one or two additional layers.
6
Secure the resulting result with a colorless varnish. It is best to apply it also in several layers.
Tip 2: How to straighten the bumper
The standard situation is happy when drivers inadvertently touch bumper Drifts. In this case, the dent on the bumper is guaranteed. In auto repair, the restoration of the bumper will cost you at least 4000 rubles. But you can straighten the bumper yourself.

You will need
- - Building dryer
- - Electric kettle
- - a garage or a box with a temperature of 20-30 0 C
- - small magnet
- - thermometer
Instructions
1
First, gather some information aboutMaterial from which your bumper is made. If there are "contraindications" to heating - contact the specialists. But, usually these bumpers are put on cars of extra-class (Lamborghini, Chrysler, Ferarri, etc.).
2
Remove the bumper from the car. Then proceed to heat the bumper. Take a building hair dryer and only lightly heat the iron.
3
After that, heat the water in the electric kettle untilTemperature 35-40 0 C and gently start to water the bumper. It is worth pouring the area in a radius of 15-20 cm from the dent. Next, bring the water to a temperature of 45-500 0 C and repeat the procedure.
4
Begin to bend the bumper into its previous state, notletting the water dry. To do this, bring the magnet to the damaged surface (even if the bumper is plastic, it will straighten, since the paint contains a large number of metals). Move the magnet from side to side.
5
Gently press the dent with your hand against the insidehand and squeeze it out. But do not use excessive force, so as not to damage the coating of the bumper. Do not let go of your hand, as soon as the bumper has straightened, it is worth a minute or two to support it.
6
Heat the water to 30-35 0 C and pour the bumper again. Repeat this procedure several times, lower the water temperature by each watering by 5 degrees, until you reach the boundary at 15 ° C. After the last watering, put the bumper in a cool dry place and leave it to dry. It is necessary that he would lie down for at least two days. After that, place the bumper in its place.
Tip 3: How to remove the bumper on Lancer 9
Withdrawal bumper It is necessary in those cases, if it is necessary to carry out its painting or repair, and also to reach those details of the car, which it closes. Consider how to make a withdrawal bumper On the Mitsubishi Lancer.

Instructions
1
To remove the front bumper You will need a screwdriver, pliers and a set ofSpanners, including the end keys for "10" and "12". Use a screwdriver to pry the radiator cover holder pin. After that, carefully remove it and do the same with the second lock. Also remove the radiator clamp retainer and the plastic grill itself. In case of breakage of plastic holders and clips, be sure to replace them with new ones.
2
Turn out the bolts that attach the bumper to the amplifier,Then find the bottom of the holders of the pads and carefully remove them. Remove the pistons designed to attach the fenders to the trim. Remember that they are on both sides. Remove the bolts securing the covers to the wings and disconnect the connector of the wires that fit to the fog lamps.
3
Remove the overlay bumper From the car. Then unscrew the two bolts that attach the amplifier bumper To the body of the car and remove it. Front installation bumper and put it in the reverse order.
4
To remove the rear bumper The same tools and additionalAllen key to "14". Disconnect the connector of the wires from the fog lamp and remove the rear lights. Unscrew the bolts, through which the mud flaps are connected to the wheel arch. After this, remove the mud flaps and front-mounting bolts bumper.
5
Unscrew the bolts in the holes under therear lights. Remove the pin from the holder and remove it. Disconnect the trunk lining by removing the holders and gently prying with a screwdriver. Find the plastic holders that are secured from the bottom. Remove the nuts with which the amplifier bumper attached to the body. Unbuck the trunk lining and take out the mounting bolts bumper, Then pull it on yourself and remove it.
Tip 4: How to glue a bumper on a VAZ
Nuisance behind the wheel, as a rule, comprehend almost every motorist, including the owner Vase. Cases of damage are frequent bumper, which, fortunately, can be repaired independently, by gluing. Therefore, you do not need to rush to the store immediately if you damage it and buy a new one.

You will need
- - polyester resin;
- - epoxy adhesive.
Instructions
1
Before you start to glue the bumper on the VAZ,Determine what material it is made of, since it is from this that the technology of its repair will depend. To do this, look at the markings on the inner surface bumper.
2
Further disconnected from the car bumper, goodclean from dirt and carefully inspect it for cracks or breakdowns. A small crack, not sealed in time, may cause a lot of trouble later, so take into account any breakage. If your bumper is polypropylene, then solder the small cracks with a soldering iron, and if the material bumper - polyurethane, then the soldering iron will be unacceptable.
3
Bumper of polyurethane glue, usingepoxy adhesive. This polymer adhesive will eliminate various damages, while saving your money. Before gluing in place of damage, straighten all irregularities by warming the bumper from the inside. Next, fit well with each other adjacent sides bumper, Having made their sweep.
4
Wipe off any degreased parts with a special solvent. After that, epoxy glue in a certain proportion, stir with a polyester resin and begin to spread it on the inside bumper. Once the glue is taken up by the film, turn it overBumper and engage in external bonding. Dry completely glue can be cleaned, but in this case, the cleaned surface will need to be painted, since the damaged film easily passes moisture, and this will have a very negative effect on the structure of the glue.
5
After the bumper has been repaired, make its full cosmetic repair, so that the glued cracks were as visible as possible.
Tip 5: How to protect the bumper
The bumper is one of the protruding partsCar, therefore it is most often subjected to mechanical influence of any external factors. It is necessary to protect the bumper of your car so that you do not spend every time buying a new one.
You will need
- - a set of parking sensors;
- - tools;
- - a soap solution;
- - building hair dryer;
- - plastic spatula;
- - rubber bands for the bumper.
Instructions
1
Install a set of parking sensors - devices,which show on a small screen the position of your car relative to other objects. The price of such a set varies between 2-6 thousand rubles. Different models differ from each other by a set of functions and the number of sensors. Currently, you can install such a system absolutely in any car. Also, many parktronics have the ability to connect to a regular on-board computer. After installation, the system will warn you with a signal if the distance between the bumper and the obstacle reaches the specified range.
2
Set "kenguryatnik" if you have an SUVOr crossover. This metal structure is attached to the bottom of the car from the bottom. It allows you to protect not only the bumper, but also the crankcase of the engine. In the car market you can find a wide range of different "kenguryatnikov" and pick up the model that will best cope with the protective function on your car. The installation can be done independently, since it is very simple. If you are not sure of your abilities, then you should contact a specialist.
3
Tighten the bumper in a transparent protective film. Such a film will protect the bumper from small chips and scratches, which often appear during operation. Also, the film can save the bumper from a crack with a slight impact. The spoiled film can be periodically changed and thus keep the appearance of the machine in its original form. Such a film is applied very simply. Wash the machine thoroughly. Apply a layer of soapy water. Remove the protective layer from the film and place it on the bumper with an adhesive side. With a special plastic spatula, start smoothly smoothing the entire surface relief while heating the film with a construction hair dryer. It is necessary to move from the center to the edges in order to expel all the soda from under the film. After this, allow the bumper to dry out. Especially large bubbles can be gently punctured with a thin needle.
4
Glue on the bumper rubber lining. They will be amortized by a shallow collision. Adhesive gum is very simple. Degrease the bumper. Remove the protective layer from the rubber bands. Carefully glue them and carefully iron. This innovation will protect your bumper, but it will spoil the appearance of the car as a whole.
Tip 6: How to make a bumper to order
Custom made bumper gives the carIndividuality and opens its owner wide opportunities for self-expression. Bumpers of modern cars are made from fiberglass using the technology of manual molding or vacuum infusion.

Design
The appearance of the bumper can both be repeatedThe existing prototype, and to represent the original design decision. There are various ways to study the design of the exterior of the car, from pencil sketches to 3D computer modeling. In some cases, manufacturers are asked to completely repeat the original design of the bumper.Matrix manufacturing
The matrix represents the device, the outerThe surface of which completely repeats the inner surface of the bumper. In a single production of the matrix is made of special types of plasticine. This matrix is quite suitable for the manufacture of one product, and after the end of work the material can be reused. In the production of the bumper series, a reusable matrix is required, which can be made of any durable and resistant material. Popular among the masters of auto-tuning are matrices made of glass mat and polyester resin.Layout of material
On the surface of the matrix alternately laid outlayers of fiberglass, which are impregnated with a binder resin. Also in the design are laid power and fasteners necessary to secure the bumper on the car. Besides manual calculations, the method of vacuum infusion, in which the contact layers of glass provided with a special device to create a local vacuum. The resulting construction is aged until hardening, after which it enters the painting.Tip 7: How to repair the rear bumper
Bumper Is an important part of the car, becauseIt is designed to protect the headlights and bodywork during light attacks, for example, in case of unsuccessful parking or arriving at the garage. However, sometimes as a result of a blow on a plastic bumper, for example, a large crack may appear. If this happens, do not get upset and immediately throw out the damaged part. You can still try to save it.

You will need
- - flat and cross screwdriver;
- - fine-grain mesh made of stainless steel;
- - Painting tape;
- - soldering iron 75 watts (can be more)
Instructions
1
The first thing you need to do is take offbumper from the car. This work is laborious and long. Using a flat screwdriver, pull out 3 pistons, which are located under the bumper and 2 pistons on each side, which attach it to the fenders. Also unscrew the fixing bolts holding the bumper on the body. Next, using a Phillips screwdriver, unscrew the 2 screws that secure the rear lights on the bodywork. Carefully remove the rear light and disconnect the harness connector.
2
In the holes where the lights were located, unscrew theOne bolt with which the bumper is attached to the body, remove the pins from the piston, and then remove it. Use a flat screwdriver to pry and remove the 4 pistons that secure the trunk lining and remove it. Remove the nuts holding the bumper amplifier. Unscrew bolts of fastening of a bumper to a body and, having called someone to the aid, remove a bumper.
3
Now take care of the damage, unscrewAmplifier and clean the inner surface of the bumper from dirt. Take a paint tape and on the outside, pull a crack in them, pressing the bumper in this place as tightly as possible. Cut the prepared mesh into small pieces 10x60 mm. After that, attach the first piece and heat it with a soldering iron, then the next one, etc. Wait for all the pieces to cool and solidify. If necessary, lighten up the bumper a little.
4
When all the bumper repair work is finished, you can start attaching it to the car in the reverse order to removal.
Tip 8: How to repair a cracked bumper
No driver, unfortunately, is immune from minor road troubles, as a result of which Bumper car may appear cracks. This spoils not only the appearance of the car, but also the mood of its owner. To solve this problem, it is not necessary to contact the auto service center, you can repair the cracked bumper yourself.

You will need
- - detergent;
- - car or building hair dryer;
- - sandpaper;
- - a piece of plastic;
- - metal staples;
- - soldering iron;
- - polyester putty;
- - primer for plastic;
- - paint;
- - Fine-grain mesh;
- - Painting tape;
- - liquid plastic;
- - Drill;
- - masking fiberglass ribbon;
- - Adhesive mass;
- - Thickener
Instructions
1
Before repairing, remove the damagedbumper from the car. Rinse it thoroughly with dirt using a water jet with a detergent and allow to dry. Prepare a car or building hair dryer and make a special nozzle with a small hole of 5 mm. Using a large sandpaper or knife, make a hole in the bumper for better welding.
2
Take a piece of plastic and, warming it uphairdryer, start sealing the crack first with one, and then with the other side. For greater reliability, you can fasten the damaged area with metal clips. Preheat the bracket with a soldering iron and gently fuse it into the bumper, bending the ends from the inside.
3
Strip the bumper from the outside, solder the polyesterPutty and primed with a special primer for plastic. At the end of the repair, using a spray gun or spray gun, apply a paint on the bumper (no more than 3 layers).
4
You can repair a cracked bumper withfine-grain network. Cut it into small pieces about 10x50 mm in size. Take a paint tape and fix it to the damaged area from the outside, pressing the crack as tightly as possible. Preheat the first piece of the grid and gently solder it in the bumper, then the second and so on all over the crack. Wait until everything cools down, and if necessary, tint the sealed area.
5
Another way is to use liquid plastic. Get liquid plastic, which will match the type of plastic bumper. Strip the crack with sandpaper and make a small V-shaped groove with a disc and a drill. Take the masking fiberglass ribbon and seal the crack from the front side.
6
Then in a shallow container mixthickener and adhesive mass and apply this mixture to the tape. When everything is dry, carefully remove the tape, clean the damaged area and apply liquid plastic on it. When it freezes, grind the surface and proceed to painting.
Tip 9: How to remove the front bumper
In those cases when the owner needs to disassemble the headlight on a VAZ 2110 car, to get full access to the specified equipment, it is necessary to remove the front bumper from the car.

You will need
- Allen key 8 mm,
- Allen key for 10 mm,
- curved screwdriver.
Instructions
1
In fact, there is nothing complicated in this procedure, despite the impressive dimensions of the dismantled part.
2
If the bumper is installedlighting or other electrical equipment, then the onboard network of the machine must be de-energized, by disconnecting the negative "ground" cable from the battery.
3
Then the radiator grille is dismantled.

4
After removing the grille, unscrew one bolt of fastening the bumper, located on the sides of the car at the bottom.
5
Having unscrewed the two front fixing bolts, the bumper is dismantled by the method of simply shifting it forward in the course of the car.
- how to remove a bumper on a vase 2110
Tip 10: How to glue a bumper
What kind of trouble do not lie in wait for?drivers while driving on roads. As the statistics show, most emergency situations occur during traffic jams on city streets. The most common accidents in such conditions are vehicle collisions, which often leads to damage bumpers on the machines.

You will need
- - epoxy adhesive
Instructions
1
In connection with the fact that in the manufacture of modern bumpers Polymeric materials are widely used, in the case of accidents, the question arises of the possibility of repairing plastic body parts.
2
To repair bumpers, made of plastic, is appliedepoxy adhesive. Therefore, in preparation for the upcoming repair of the bumper, you need to purchase an epoxy-based repair kit in the car dealer. In the complete set of a repair set enters and стеклоткань.
3
Epoxy adhesive is a two-component adhesive. It contains a hardener, which must be thoroughly mixed before use in a certain proportion (see the instructions on the packaging). Ready-to-use glue impregnated fiberglass, which is glued from the inside to the damaged sections of the bumper.
4
In those cases where it is necessary to strengthen the parts to be glued, a metal mesh is glued to the inner surface of the bumper, which is covered with glass cloth impregnated with epoxy glue.
5
Drying, or rather, polymerization of epoxyglue occurs within a day. After the specified period, the final processing of the bonded surfaces is carried out: grinding, painting, polishing.
Tip 11: How to polish the bumper
As a result of a minor accident or an unsuccessful parking Bumper there are unattractive scratches. Eliminate this trouble and return the damaged details to an attractive look with polishing. This procedure does not require any special skills, so you can do it yourself.

You will need
- - car shampoo;
- - polishing machine;
- - coarse abrasive paste;
- - fine abrasive paste;
- - soft dry cloth;
- - Means with Teflon and wax;
- - polishing.
Instructions
1
For convenience, before starting work, remove the bumperFrom the car. Wash it thoroughly from all sides with car shampoo. Leave until completely dry. After this, using a solvent, degrease the surface of the bumper.
2
Take the polishing machine and install it on it.a circle designed for rough polishing. Apply a large-abrasive paste to the bumper and turn the machine on to the lowest speed, start distributing it evenly over the surface. At the same time, your movements must be progressive.
3
Switch the machine to a speed of 2500 revolutionsper minute and keep working. Be sure to monitor the degree of surface heating, as it can damage the paint layer. At the end, wipe the remainder of the paste with a soft, dry cloth.
4
Now put on the bumper is already fine abrasive paste, and on the machine, install the appropriate polishing wheel. Do the polishing in the same way as described above.
5
When the procedure is complete, proceed to thesurface treatment with a special agent that has Teflon and wax in its composition. It will help to return the bumper shine and give it water-repellent properties.
6
Install on the polishing machine foam rubbercircle and apply a small amount of money to the bumper. Try to distribute it as evenly as possible so that there are no clots left. Turn on the middle speed and gently work the surface.