Tip 1: How to apply airbrushing
Tip 1: How to apply airbrushing
Airbrushing is what your car doesunique and unusual. The picture can be applied absolutely any - everything depends on your desire and imagination. And if you know how to paint cars, then you can easily create a masterpiece on your car.
Instructions
1
The process of applying airbrushing to a car needsstart with the general preparation of the machine. First, develop a sketch of the drawing that you would like to see on your machine. Only when you create it, consider all the technical characteristics of your car: the look, make, model and color. Based on these indicators and you need to come up with a picture. Be sure to think about what area this painting will occupy, from which side it will be. After you finally figure out the sketch, find yourself a good artist, with whom you will discuss all the details concerning the future airbrushing.

2
After this, the artist proceeds to performdesign-project. He does this with the help of special programs that allow you to see the drawing in its real volume and how it will look on the car. At this time, you need to prepare the machine for drawing. For this, all the details that are not intended for painting are removed. These are lights, turn signals, door handles and others. After this, all the chips must be fixed on the machine, so that the pattern is flat and does not fall anywhere. The surface for airbrushing should be ideal.

3
After all repairs andfinal approval of the drawing, you can go directly to painting the machine. As a rule, it happens in a special box, where there are all conditions for doing such jewelry work. The pattern is applied by airbrush using several dozen different shades. This allows you to make the drawing more voluminous and effective. This stage of staining the machine can take from a few days to several weeks.

4
After the image is applied, itsmust be secured and protected. For this, the pattern is usually varnished in a special painting chamber. Why varnish? Yes, because it best protects the car from the harmful effects of the external environment, and it gives depth and clarity to the image. At the end of this procedure, the car is polished. It is necessary to give shine and shine. Now it remains only to return to the place all the dismantled parts. And you can go to the streets on your unique car.

Tip 2: How to make airbrushing yourself
Many paid attention to tuning cars,made by aerography. The colorfully designed car has a unique look and is distinguished from the general flow of vehicles. Decorate the car will help specialists in aerography. But if you decide to make such a tuning yourself, you will be able to fully demonstrate your creative abilities.

You will need
- - Airbrush;
- - the compressor;
- - a hose;
- - paint;
- - varnish;
- - polishing paste;
- - thick paper or cardboard;
- - wet wipes;
- - Scotch tape;
- - sandpaper;
- - scissors.
Instructions
1
Select the tools for drawing the picture. You will need a small compressor with a built-in relay. Acquire an external spray airbrush equipped with a special needle. The kit usually also includes a hose, funnel, connector and accessories for cleaning the airbrush. Choose the paint taking into account the features of the drawing that you intend to apply to the car.
2
Decide on the choice of image. Save time and effort while doing this, if you model the picture on a computer and correlate it with the body color. If you are doing aerography for the first time, do not try to use too many color shades. It will be enough to limit to two or three colors.
3
Make a stencil. To do this, you can use thick paper, thin cardboard, special film or foil. Apply the contours of the pattern to the selected material and cut out the resulting image over the internal lines.
4
Prepare the car body. It should be cleaned of impurities, wiped with a degreasing compound and covered with a primer. Wait for the primer to dry completely. For better application of paint, it is best to perform a primer in two or even three thin layers.
5
Secure to the selected vehicle surfacestencil drawing using scotch tape. Begin painting the outline of the pattern with an airbrush. Do this without haste, observing the accuracy. Do not allow the ink to stain. To qualitatively draw the details of the image, use an additional light source, pointing it at the work area.
6
When the pattern is ready, let it dry,and then carefully disconnect the stencil from the body. Now the finished image can be covered with a layer of protective varnish and polished. The airbrush drawing will be a stylish and original decoration of your car.
Tip 3: How to draw airbrushing
Aerography today is a fashionable artisticThe current, which is widely used in the decoration of cars, laptops, home appliances, furniture and much more. Learning to draw in airbrushing technique is a matter of practice, and if you already have basic drawing skills with the usual tools (pencil, paints, brushes) and you know the basic principles of painting, you will easily master airbrushing.

Instructions
1
To begin with, master simple actions thatYou can use an airbrush to get used to an unusual instrument, and then move on to more complex patterns and effects. Find qualitative and interesting lessons on the web, both in text form and in video format and practice by performing step-by-step exercises. Consider other people's paintings made by airbrush and try to understand the technical nuances that they contain.
2
At first you might think that you can notto cope with an unusual airbrush - but after a while you will get used to it, you will fill your hand and learn how to make clear and beautiful lines, varying their direction and thickness.
3
Practice making simple drawings, keepingairbrush on a weight with a firm hand and not shaking it. Never touch the drawing with an airbrush needle, and also exercise to control the flow of paint - if you apply too much ink, it will leak and may ruin your drawing.
4
Do not apply air and paint at the same time -first press the air supply button, and then simultaneously with the movement of the hand, start applying the paint to get a smooth line. Keep the air button depressed, do not release it.
5
Turn the paint on and off at the same time.according to the picture - make lines and strokes of the desired size and color. Begin learning with simple lines and then go directly to the drawings.
6
Learn how to get the right paint spray,the necessary fragments of the picture exactly where they should be. Draw as often as possible and as much as possible to get used to airbrushing technique and learn how to intuitively apply points and lines to the right places.
7
In order to apply a wide line with a smoothstretch, take the airbrush away from the drawing surface and draw a line. The farther the airbrush from the surface, the wider the line. Train to make more clear and thin lines, and then wider and scattered. This will help improve the technique and not be afraid to draw on other people's interior items and cars in the future. Having mastered the drawing of several types of basic lines, you can create any drawing.
Tip 4: Aerography on the car
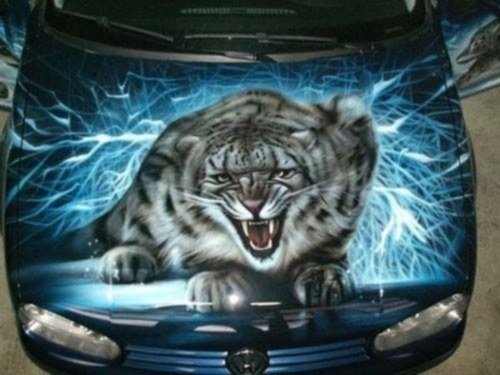
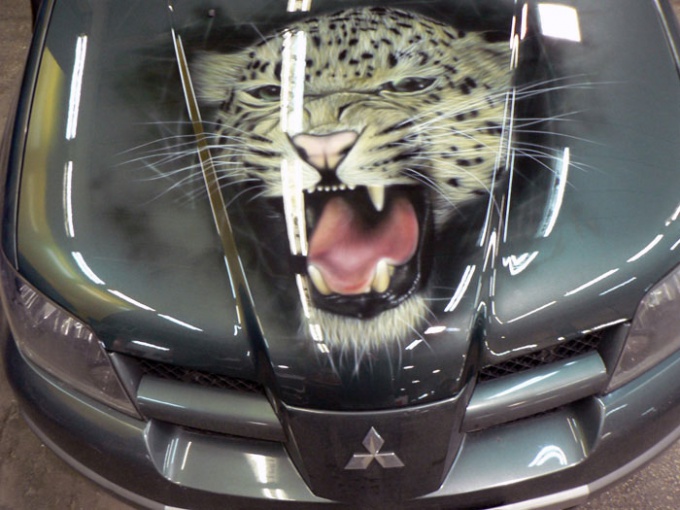
This kind of tuning, like airbrushing, veryhas been popular in Western Europe for many years, recently this fashion wave has reached our country. Today in the streets of most cities you can see a car with a girl's face or a dragon, with abstract drawings and other things. This car fascinates with its beauty and captures the looks of passers-by.
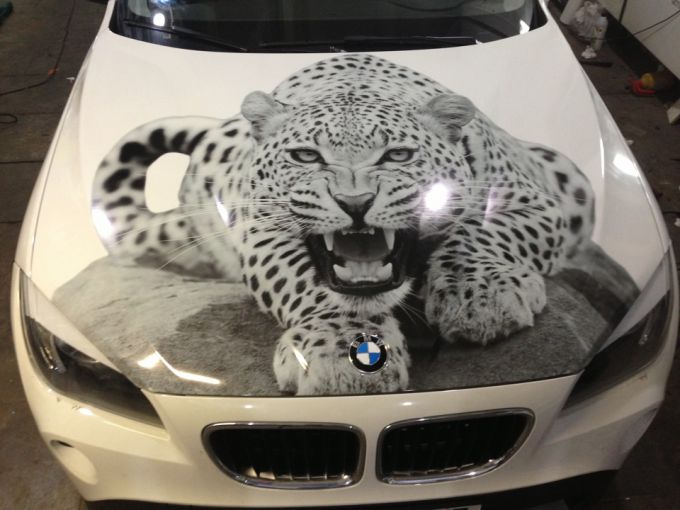
The technology of airbrushing is quite simple and understandable. To apply the drawing, an airbrush is used, in which the paint under pressure is distributed and applied to the car itself. With the help of experienced masters, high-quality dyes, you can depict a fairly realistic object. Apply to the car often abstract images, animals or fantastic objects.
Before drawing the picture you need with the artistto develop a sketch; then, using a computer program, it is superimposed on the image of a tuned car, which allows you to choose the location of the picture in the best way, to imagine how it will look in the finished version.
When exactly the picture and itslocation, you can proceed to the second stage: preparing the car for airbrushing. First, the lacquer is removed from the paint surface, then the surface is degreased. At this time, a specialist in drawing prepares the necessary materials, selects the paint and its color range.
Depending on how complex the pattern is,the master can produce all the work in several sessions, after the last car is varnished. The car with airbrushing is very bright, it stands out on the streets of the city, it is a means of individualizing the owner of the car. At the same time, airbrushing can save a car from hijacking, because it is very difficult to sell such an aggregate because of its uniqueness.
Permission from transportation services for applicationairbrushing is not required, in the presence of 50% of the main tone on the car, it is necessary to make changes to the technical passport. The only taboo can be only the coloring of cars for transportation of special services. The cost of work on airbrushing directly depends on the complexity of the work, the area of the drawing, the skill of the artist, the cost of the paintwork materials used for airbrushing.
Tip 5: How to learn to make airbrushing
Aerography is quite widedistribution, now it is used in the design of cars, electronics (for example, laptops, phones), household appliances and even furniture. If necessary, you can master the technique of airbrushing, having only the initial drawing skills.

Instructions
1
Without which you can not do without, it iswithout practice. Train as much as possible, "stuff your hand." At first you will get used to a new instrument, so you can not perform complex drawings yet. To take the first steps you will be helped by lessons in text or video format. Choose on the Internet the most interesting and understandable for you materials. As a rule, such lessons are written down step by step, so that you will not experience any difficulties.
2
Once you get used to the airbrush and alreadyyou can perform beautiful and smooth lines of different length and thickness, proceed to create drawings. For complex yet do not take, perfect skills gradually. It is recommended to hold the tool firmly, without shaking. Try to control the flow of paint all the time. The fact is that an excessive amount of it will only ruin your drawing with smudges. In addition, make sure that the needle of the airbrush does not touch it.
3
To learn how to "feel" the technique of airbrushing,and also to put each element in the right place, it is necessary to train as often as possible. Do not regret this time, because that's how you will master the drawing in a short time.
4
Please note that it is the distance from The balloon to the surface affects the width of the applied line. First, learn how to make fine clear lines, and only then move on to drawing wide ones. Thus, you improve your drawing technique and can confidently decorate cars or interior items. Knowing the types of basic lines allows you to create almost any drawing.