Tip 1: How to make a server
Tip 1: How to make a server
Sharing (or cardsharing) is designed to havethe ability to watch paid TV channels with one smart card (DVB-card) on multiple TVs. In addition, the sharing can also be used on the basis of the so-called sharingserver. Its main goal is to provide a wide range of users with access to coded pay channels for a fairly symbolic fee.

You will need
- - a computer;
- - the Internet;
- - the programmer;
- - smart card.
Instructions
1
If you are not very good at computers andsatellite tv, register on one of the many specialized forums. You can find them using any search engine. This will help get answers if you suddenly something will not work.
2
Collect all the necessary components, namelycomputer with good performance based on Windows XP or Linux and with internet connection, programmer (device for reading Phoenix-based smart card), legal smart card and NewCS software.
3
Install the program NewCS from the official site.When installing this software, you may need the help of craftsmen from specialized forums and installation instructions that you received when downloading a program from the manufacturer’s website.
4
Connect the receiver (programmer) to the computer.When connecting, use the software that was purchased with the programmer. If it is not available, find the necessary drivers for the programmer on the Internet.
5
As a client for broadcasting TV, better use the Dreambox, with preset settings.
Tip 2: How to build a server
Sooner or later, any person who is involved in Internet projects has the idea to create his own server. And then you can stumble upon the pitfalls, because architecture serverit should be different from the architecture of a regular home computer.

You will need
- Case with power supply, motherboard, processor, coolers, RAM, hard drives
Instructions
1
Before assembly serverand you need to decide whether to take the case or platform.The platform is a special adapted motherboard and the case itself. For a more suitable assembly, it is better to buy a case with a power supply and separate contents for it.
2
The power supply must be at least 350-400W in order for it to withstand the load (if server will have 4 hard drives, it will be at least 400W).
3
After installing the power supply, select the motherboard. Fee must be serverNaya, becausein its structure, it differs from the boards for home computers (the greater the amount of ceramics for cooling and the removal of excess electricity). Server boards sometimes have more network ports and SATA connectors. When choosing a board for serverand it is necessary to choose models in which the memory is located perpendicular to the wall of the case. This contributes to better cooling.
4
Next you should choose a processor for the motherboard (by the number of socket-a) and the cooler. The cooler should be selected by blowing hot air - a cooler for serverand blowing hot air will be upright, and notsideways. When installing the cooler, it is necessary to apply thermal grease between the radiator and the processor. The radiator is installed with ribs perpendicular to the rear wall of the case so that it is blown with other coolers.
5
Next, install the RAM,preferably not less than 4 gigabytes for standard needs and a smaller load. Then hard disks of the required volume are installed. For the security and protection of information, it is desirable to combine several hard drives into a RAID array. If necessary, a CD-ROM is connected. The server is ready.
Tip 3: How to make a computer server
There is a certain category of users who do not want to use additional devices to create a local network. When you need to provide synchronous Internet access from several computers, you must configure one of them to perform the server functions.

You will need
- network adapter, network cable.
Instructions
1
Select the computer that will receive the directaccess to the Internet. It is recommended to use for this purpose a stationary computer that has the highest performance among other devices.
2
Purchase an additional network adapter. It is better to use an internal network card connected to the motherboard via the PCI slot.
3
Connect the adapter to your computer and installits drivers. Connect this equipment to another computer using a network cable. Connect the Internet connection cable to the first network card.
4
Create a new connection to the Internet. Configure its settings based on the requirements of your provider.
5
Open the Network and Sharing Center. Navigate to the properties of the second network card. Open the TCP / IP settings (v4). Activate the "Use the following IP address" option. Set for this adapter a static (static) IP, whose value will be, for example, 43.43.43.1.
6
Go to the second computer (laptop). Open the network adapter settings, as described in the previous step. Specify for this network card the parameters whose values follow from the IP address of the first computer: - IP address 43.43.43.2- Default gateway 43.43.43.1- Preferred DNS server 43.43.43.1.
7
The setup of the second PC is now complete. Go to the first computer and open Internet connection properties. Find the "Access" tab and open it. Allow Internet sharing for all network devices that your computers have created. If necessary, configure the firewall and firewall settings.
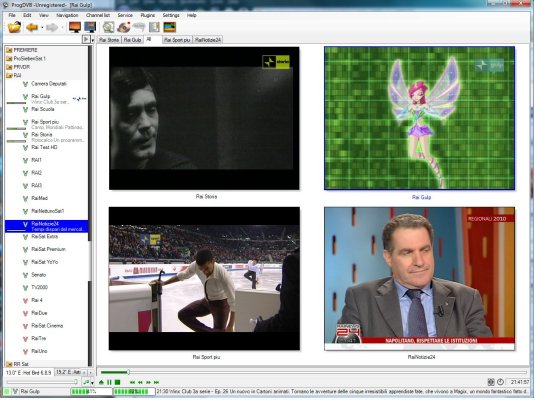
Tip 4: How to set up a home Sharing
The concept of "sharing" or "cardsharing" comes fromEnglish words - card (card) and charing (general access). In other words - general access to the map. For this, a server connection is created - a client that is implemented on the basis of a local network, the Internet or Wi-Fi. The server has an original access card installed to view encrypted satellite channels, and on the client there is corresponding software that allows you to watch TV channels.
You will need
- - DVB card SkyStar2;
- - program ProgDVB;
- - plugin csc 4.0.0.4;
- - Internet connection
Instructions
1
Install a SkyStar 2 DVB card on your computer.Customize its software. The SkyStar 2 card is used both for viewing and recording open and closed satellite channels through a computer, and for accessing the Internet using the asynchronous connection option. Connect to the Internet via landline: ADSL, GPRS or cable Internet. This is required for real-time transmission of dw-keys to view coded satellite channels.
2
Install the ProgDVB program on your computer.Configure the DiSEqC parameters when you have a satellite dish tuned to several satellites or specify a specific satellite. Install the csc 4.0.0.4 plugin, download it, unzip the archive into the ProgDVB folder. The msvcr70.dll file must be moved (not copied) to WINDOWSSYSTEM32 so that this file does not remain in the ProgDVB folder, otherwise the ProgDVB program will not start. Check the installation, to do this: run ProgDVB, go to the "Plugins" menu, in the opened menu the CardServer Client tab should appear.
3
Configure the csc 4.0.0.4 plugin.Launch ProgDVB, go to the "Plugins" menu of CardServer Client Configure Server. In the window that appears, list / set the following: Protocol: newcamd525; User name: login to access Sharingu (issued upon registration); Password: password for access to the chariga; Card Server IP Address: server name or IP address; Port: port of connection (number is given when connecting); Optional Parameters: 0102030405060708091011121314 (des key). Then click the Add Item button, then the Save Configuration button, the window should close. Configuration is over.
4
Turn on the desired channel in the ProgDVB program.selected package home sharinga. If the image does not appear after a few seconds, do the following: go to the channel properties; Double-click in the window that appears on the desired CA type (ID), which will be issued to you when you connect. Click "OK", the image will appear in a few seconds.
Tip 5: How to call the server
Choosing a name for a server is one of the important points and may depend on various parameters, for example, the total number of servers, functions performed, location, size, etc.

Instructions
1
When choosing names for servers tryselect those that would in one way or another indicate its functions. This condition is not mandatory, but if necessary, it will be easier to determine in the future which server will play which role. The main thing is that the logic when choosing a name is clear to you. Here there is a large field for the manifestation of one’s own imagination and the realization of ideas.
2
One option may be the names of differentbirds and animals. For example, raven, falcon, peregrine, bear, wolf, hawk, etc. Based on the properties characteristic of each of them, let's give the names of the servers.
3
Another option is to use Greek.the alphabet. In this case, the servers will be called alpha, beta, gamma, delta, etc. An alternative to it can be the phonetic alphabet of NATO troops: alpha, bravo, charlie, delta, echo, etc.
4
Also popular are geographical names, names of stars and constellations, planets, signs of the zodiac. For example, the names of the planets and their satellites can be used to organize the hierarchy.
5
The next option - the names of various characters.These can be heroes of serials, comics, cartoons, books, etc. Examples include karlo, buratino, karabas, malvina, etc. Choosing certain names, be guided by your own preferences: some are closer characters of Walt Disney cartoons, and others are heroes of Tolkien's works.
6
Can also be used to refer to femaleand male names. As options, consider names from the list of hurricanes, which can be found at http://www.dvgu.ru/meteo/book/names.htm
7
Depending on imagination and own hobbiesYou can come up with a sufficient number of variations of themes for server names. In addition to the above, popular are: vegetables / fruits, Greek, Roman and other gods, the names of writers, scientists and prominent figures, musical groups, chemical elements, etc.


