Tip 1: How to draw wings in Photoshop
Tip 1: How to draw wings in Photoshop
Many people thought about how to make themselvespictures of an angelic appearance or vice versa, to show a diabolical sparkle. The easiest and fastest way is to use brushes for Photoshop. But the quality of such wings, to put it mildly, wants to leave the best. Therefore, you should use another option.

Instructions
1
Go to the "File" menu and create a new document. Size choose as you wish, but for convenience, the size is not desirable small. Fill the bottom layer with black. To do this, use the Fill tool.
2
Create a new layer. Select the Rectilinear Lasso tool in the toolbar. Using it, draw a wedge - so that the sharp end looks right. Then fill the drawn figure with white color. Go to the menu "Select" -> "Deselect". Next, in the "Edit" menu, select "Free transformation" and rotate the wedge about 20 degrees. Press Enter.
3
Select "Filter" -> "Stylize" -> "Wind". Select the "Left" check box. Use this filter as many times as necessary to achieve the result, depending on the size of the image. Then again apply arbitrary transformation and rotate the pattern by 40 degrees in the opposite direction. Again apply the wind filter four times. Return the wedge to its original position using an arbitrary transformation. Again apply the wind filter, but already twice. Move the resulting feather up and copy the layer four times. The point is to place these feathers in the form of a fan. To do this, also use the free transformation. Put a pen on each layer in a certain position. After that, turn off the visibility of the bottom layer and merge all previous layers by selecting "Merge visible". Again make the bottom layer visible.
4
Use the Rectilinear Lasso tooland draw the same wedge at an angle to your wing. The sharp edge should look in the opposite direction - to the left. Create a new layer, fill the wedge with white and do not forget to delete the selection. Apply the wind filter three times. Repeat this procedure until the desired result is achieved. Glue the layer with feathers. In order to color the feathers, go to the "Image" -> "Hue / Saturation" menu. Check the "Toning" box and select a darker color. This is necessary for convenience.
5
Go to the "Filter" menu and select "Distortion" ->"Wave". Put the number of generators 1, the other numbers are selected individually for your image. Through the "Hue / Saturation" menu, return the wing a white color. In the "Image" menu, set the "Grayscale" mode. Then select "Image" -> "Mode" -> "Indexed Colors". Here, go to the color table and set an absolutely black body and click OK. The wing is ready.
Tip 2: How to draw an angel
Angel is a symbol of purity and Christmas holidays. Every relative and friend will be delighted to receive your own Christmas card with the image of an angel from you.

You will need
- - Adobe Photoshop
Instructions
1
As the original, from which you will draw a picture, take the image of a crystal angel. Simulating its translucency and airiness will be a good option for a Christmas card.
2
Create a new file in Photoshop with a white background, 500x800 pixels in size and RGB color scheme.
3
Create a new layer (Ctrl + N) and fill itblue color using the Fill tool. That the angel did not look at the photos alone, add it to the image of the Christmas tree, and set the appropriate mode of light and shadow.
4
Open the Filter menu and select Render. In the Render menu, select the lighting effect section. Set the light so that the shadow falls from the lower right corner to the upper left corner.
5
Create a new layer on which you willto draw an angel. Take a soft-edged brush with a small diameter, select a white color and draw a round shape of the head first, then a flared silhouette of the dress.
6
Paint the outlines from the inside with the same color - white or light blue, depending on what color the angel you want to get.
7
Go into the Blending mode of the layer and adjust it so that the angel is translucent and the background shines through it.
8
Create a new layer, take a brush of the sameDiameter with which you painted an angel, and white with a transparency of 55% add the contour of the head of the angel volume. With a thin, opaque white brush, draw a pattern on the angel's dress to make it look lacy.
9
Create another layer and draw the same wings on the brush. With a slightly darker color and a thinner brush, draw the feathers, giving the wings texture and volume.
10
To make the wings the same, drawfirst one wing, and then copy the layer with the wing and in the image editing menu, flip the wing horizontally, and then place the rotated object in the desired location.
11
It remains to finish the angel hands, folded in prayer. Take a thin brush and draw the silhouette of the hands folded on the chest, so that they are noticeable against the background of the body.
12
Then take a brush of a different diameter, select a yellow color, set the semi-opacity of the brush and draw an oblong halo above your head. Your angel is ready.
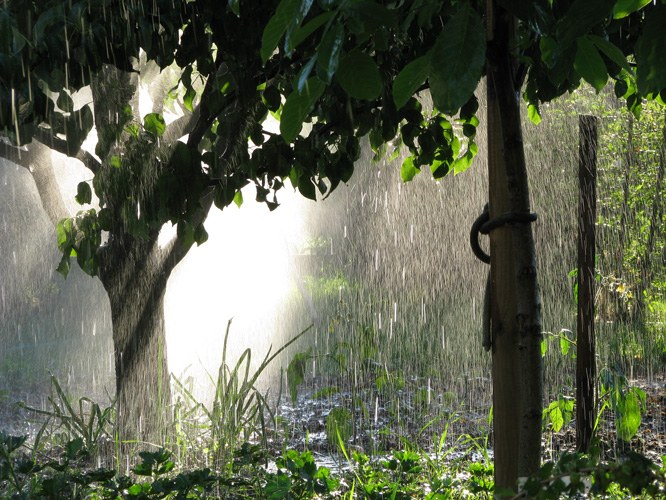
Tip 3: How to draw rain in Photoshop
Using Photoshop tools, you can apply the effect of falling rain drops on a photo. Rain in this graphical editor is done by adding to the picture noise, transformed by motion blur.
You will need
- - the program Photoshop;
- - the photo.
Instructions
1
Upload a picture to the image editor on top of which you are going to draw rain. If you want an image that is close to realistic, use a landscape shot in cloudy weather.
2
Using the Layer option of the New group of the Layer menu, add a new layer with black fill to the file. To fill a layer with color, use the Paint Bucket Tool.
3
Apply a monochrome noise effect to the layer. To do this, open the effect settings window with the Add Noise option of the Noise group of the Filter menu. Check the Monochromatic check box and select Gaussian in the Distribution field. Set the Amount parameter to the maximum value.
4
Apply a motion blur to the layer with noise. With the Motion Blur option in the Blur group of the Filter menu, open the filter settings. From the value of the Angle parameter it depends in which direction the rain will be in the picture. Usually values from forty to sixty degrees are used. This produces a rain falling from the upper right corner to the lower left. If you want to draw a rain falling from the upper-left corner of the picture, set the Angle parameter to a negative value. To obtain a sheer drop drop, a value of about ninety degrees is required.
5
Set the Distance parameter toway to get traces of rain drops flying through the air. As a rule, there are enough sizes within forty-fifty pixels. If the value exceeds two hundred pixels, too long strips are obtained.
6
Change the blend mode of the rain layer from Normal toSoft Light or Screen by selecting one of the blending modes from the drop-down list that can be found in the Layers palette. If Rain is too light in Screen mode, reduce the brightness of the layer and raise its contrast by opening the Settings window with the Brightness / Contrast option of the Adjustments group of the Image menu. Reduce the value of the Brightness parameter, and increase the value of the Contrast parameter.
7
Combine the layers of the file with the Flatten Image option from the Layer menu and save the resulting image with the Save As option of the File menu.
Tip 4: How to draw a flame in Photoshop
There are many ways to simulate fireusing Photoshop. The flames can be painted with brushes. A fire image that is close to realistic can be obtained by using the Difference Clouds filter and the gradient.

You will need
- - program Photoshop.
Instructions
1
With the New option of the File menu, create a document in RGB mode. The size of the created canvas can be any. From the Background content list, select White.
2
Make the primary color black, and the background color -white. You can adjust these colors manually by opening the color palette by clicking on the colored square in the tool palette, or you can get the same result by pressing the D key.
3
Create a foundation for the fiery texture, applying tothe only existing Diffusion Clouds filter in the document from the Render group of the Filters menu. You will need to use the filter several times before the picture in the document window looks like a black and white image of the fire.
4
To color the resulting image, applyoption Gradient Map from the Adjustments group of the Image menu. In the dialog that appears, check the checkbox Preview, if it is not there. This will allow you to observe the process of coloring the fire in the document window.
5
To adjust the colors, click on the gradient stripin the dialog box. You will need to get a gradient consisting of black, orange, yellow and white colors. To do this, click on the leftmost color marker and right after that - by the color rectangle at the bottom of the dialog box. Select black color in the opened palette. Clicking under the strip of the custom gradient, add one more color marker. Select the orange color for this marker. In the same way, put a yellow marker. The rightmost marker should be white.
6
Moving the markers, achieve maximumrealistic coloring of fire. To add the created gradient to the sample palette, click the New button. The same gradient can be used to color white fire languages on a black background created with the help of brushes. Apply the filter by clicking on the OK button.
7
Modify the resulting picture. Use the Brush Tool to paint part of the image in black in such a way as to highlight several fire languages.
8
If necessary, slightly pull upthe resulting languages using the Liquify filter from the Filter menu. To correct the created image, the Warp option from the Transform group of the Edit menu is also suitable. Before applying this transformation type to the image, duplicate the layer with the Dublicate Layer option, which is located in the Layer menu.
9
Save the resulting fire by applying the Save option from the File menu.