Tip 1: How to sew a belt
Tip 1: How to sew a belt
To the skirt or pants, the belt is often quite simplesewn, but not always the most successful option. For example, on a classic paraded skirt, the sewn belt looks beautiful, especially if it is sewn correctly, by all rules.

Instructions
1
A belt pattern is usually specially made to cover details of the skirt is not attached. It is assumed that it is so simple that you make it yourself.
2
On the underside of the fabric, draw a simple straight line. The size of the belt (length) will tell you your pattern of the skirt, plus you need the allowance for the fastener on the right.
3
Then measure the width of the belt (according to your desire and width of the special gasket, which is easy to buy) and make allowances for seams - 1.5 cm in all slices.
4
To the wrong side of the cut belt, irona special gasket that you have chosen in the store. It can be called a bundix or fleece and have (or not) perforated edges for easy sewing. The upper edge of the belt will end up in your fold.
5
Then take the skirt and sew the belt. To the upper edge of the skirt, fasten the belt (the front side to the front side) so that the left margin has an allowance for the seam, and for the right side - for the seam and buckle. Now the belt can be stitched (it is better to accurately on the perforated line).
6
After this, unscrew the belt up and press the seam allowances on it. The second longitudinal allowance is pressed against the underside of the belt.
7
Now the belt needs to be folded along in half, facialside inward, and the ends are cobbled together and stuck so that the left one is right next to the edge of the cut of the skirt, and the right one protrudes at the width of the fastener. The seam allowance is cut off next to the stitch, cut the upper corners obliquely.
8
And the last step: unscrew the ends of the belt, pin the inner edge over the seam and sew it by hand (or stitch it on the machine, detaching it along the contour to the edge). When the belt is sewn, at the left end you can sweep a loop, and on the right one try and sew a button to the buckle.
Tip 2: How to sew a belt to your trousers
There are many models of trousers - pants without belts or on an elastic band, flared or narrowed, withhigh landing and low. But there are traditional for all classic pants, which are necessarily sewn with a belt. If you sew a classic trousers, you should also sew and sew on them a belt.

Instructions
1
Open the belt of the necessary length and width. Glue it with a special adhesive tape or non-woven fabric. Remember that for each fabric uses its own glue base. So for woolen and denser fabrics with uneven structure it is most convenient to use a special adhesive tape, but for more thin and smooth fabrics, it is recommended to use glue doublerine or glutinous fleece with dot coating. All this is necessary in order to keep your belt in the correct form and not deformed.
2
Process the inner cut belts oblique bake. To do this, iron it and attach one slice of the beika to the slice belts, then skirting the slanting bypassing the slice and pour the stitch again.
3
Pin the belt to the top section of the trousers, but not the side where the sewn-on bikini is sewn, and the other, then lay a line along the entire length belts. Then bend the belt and gently squeeze it through a damp cloth.
4
Now start processing the corners belts. To do this, it is necessary to grind one corner straight, and in the second corner you need to leave the button hinge.
5
Cut off the corner and unscrew the belt, theniron it and be sure to make small bevels where the zipper of trousers is located. This is necessary in order that the lightning can not be found on the belt and does not catch it.
6
Attach the belt to trousers so that the stitch is in the stitching seam belts from the front side, and from the back side into the seamsewing oblique beiki. After the work is finished, once again iron the finished item. Do not forget to make a loop on the trousers' hood and sew a button. Sew the button so that the belt of the trousers is slightly free at the waist. It is desirable to wear classical trousers under the belt.
Tip 3: How to sew pants
If pants, which you really like, have become too big, you can find a solution to this problem. They need to be sewed on the sides or in the belt. And to do it correctly and quickly, follow the instructions below.

You will need
- - a mirror;
- - Crayon;
- - tape measure;
- - ruler;
- - scissors;
- - thread;
- - a needle;
- - sewing machine
Instructions
1
If the pants you have become big in the belt and theirit is necessary to sew, unlock the loophole, gently prop the belt and then cut it in half. Remove part of the stitching (finishing) along the middle seam. Then work with the middle seam: sew it so that the pants fit better.
2
Then sew the belt, put it on the trousers, restore the finishing line. Sew the loafer again. Now, if you did it right, pants should be much better.
3
If there is a need to cover the trousers at the seams, forstart putting them on, stand in front of the mirror and mark the places (on yourself, shallow) in which you want to reduce the volume: the back middle seam, side seams and seams on the inside of the leg. Mark and other places that will be sutured.
4
Remove the trousers, swipe the planned lines first one leg, then the other.
5
Again, put on your trousers and, standing in front of the mirror, compare the legs. If everything suits you, tear up the seams and make new ones along the planned lines.
6
To keep your pants in shape, reduce both on the outside and inside the product.
7
After you make new seams, iron them and try on the trousers.
8
Only after you make sure that everything is correctly done, and the trousers are now just in size, you can cut off excess surpluses on the seams and again sweep them.
9
If you want to sew a few flared pants inStraight or narrower to the bottom, put them on, mark the knee line with a pin. Mark the desired width of the trousers. Remove pants, take a long ruler and draw a straight line of narrowing. Stitch the seam along it, sweep the edges and smooth out the seams. Estimate the result in front of the mirror. If you did everything correctly, the pants should ideally sit on you without any distortion.
10
Another option: put the pants on the left side and evaluate on the spot, to what state you want to sew them, you can immediately sweep or draw a seam. Take off and sew on the marks.
Tip 4: How to sew a belt to a skirt
To sew a skirt independently under force evenbeginners dressmakers. Moreover, it is often with this product that many people start sewing. As a rule, at first these are simple skirts-the sun on the elastic band and the trapezoid. But, having stuffed a hand, skilled workers start more complex models. And here just waiting for the first difficulties - some nodes are not obtained from the first time and cause difficulties.

You will need
- The main fabric, glue fabric, scissors, threads in the tone of the main cloth, pins, needles, ruler, chalk.
Instructions
1
Especially often the work stops at the waist. To sew a belt to a skirt correctly and accurately some knowledge is required. For the beginning it is necessary to prepare the belt itself. To do this, a strip of 6-7 cm wide is cut from the fabric along the share strand and makes an increase of about 2 cm. The length of the belt should be equal to the waist circumference and another 7 cm, which fall on the allowances and on the fastener.
2
To keep the future belt in shape, it needsduplicate. To do this, you need a glue fabric, from which a strip is cut along the length and width equal to the belt in the finished form. On the wrong side of the future belt in its upper part, having deviated from the upper cut by the size of the allowance, place the strip glue and press it with an iron.
3
After that, the detail is folded in half by the facialside inward and grind off at the edges, going around the corners by about 1.5 cm. The seam allowances at the corners are carved, and at the end of the line, cuts are made from each side. After that, the belt is turned out, straighten the corners and press.
4
Belt is applied face-to-faceside of the skirt, combine the slices, baste and lay the machine line from the waist. Then the seam is bent around the waist, pivoting its free cut on the wrong side (the cut can be simply swept to avoid stratification) and baste. The machine seam is laid from the front side or along the edge of the belt, or directly into the stitching seam.
5
At the end of the operation, the product must be ironed well.
Tip 5: How to sew a zipper in jeans
On jeans, one of the weakest places is lightning. I really do not want to throw out almost new, well-preserved jeans because of broken gulf, but also to wear them,constantly at the risk of being in an awkward position, is also not worth it. If the lightning just breaks apart or the dog breaks, do not worry - just buy a new dog, remove the fasteners from below and slip it. But if all the same the teeth of the fastener fell out or it broke, it is necessary to replace lightning on the jeans.

You will need
- - Jeans;
- - a new lightning;
- - sewing machine;
- - thread;
- - A needle.
Instructions
1
Buy a valid fastener in the store or shove off other jeans. To sew lightning to the jeans, carefully disentangle all the details of the old fastener, including the belt and part of the seam stitching the trousers. Then iron all the parts.
2
3
4
5
6
7
8
9
Tip 6: How to sew a secret zipper
Lightning is one of the most convenient ways to makefunctional and invisible clasp on clothes, even if the thing is fitted and elegant. A secret zipper is sewn into clothes, in which the fastener should be imperceptible. When sewing a thing at home, there is often a need for an invisible clasp, and the question arises - how to sew a hidden lightning.

Instructions
1
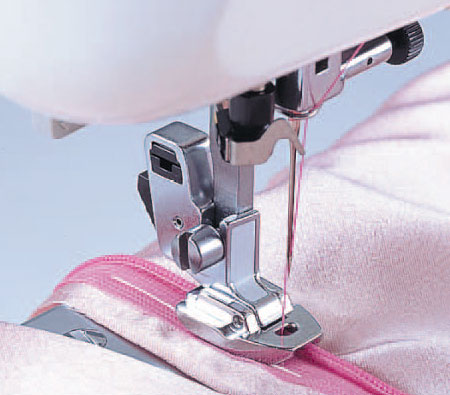
Measure the length of the cut into which the clasp will be sewn, and buy a hidden lightning, 2 cm longer than the length of the cut. If your sewing machine has a presser foot for concealing a concealed zipper or for a hidden seam, use it.
2
Uncover lightning and put it on the cut of the left knit fabricface. The width of the allowance is calculated and subtract one centimeter from it to get the distance at which you need to pin the left half of the zipper to the left margin from the edge.
3
Find a thin line under the spiral of lightning. Place the product on the sewing machine while sewing the zipper so that the spiral is to the left of the needle. Start baiting lightning to the fabric from the top edge and end lower.
4
Close lightning and take care of its right side. Place the right side of the zipper on the right side of the allowance, at the same distance as the left one.
5
Pin with safety pins or sweep lightning with a fabric by hand temporary stitches. Open the lightning and again place the product under the needle of the sewing machine. Now the spiral should lie to the right of the needle.
6
Attach lightning to the fabric in the same way as in the previous case - from the top to the bottom.
7
After that, close lightning and, having bent its free bottom edge, sew a seam below a lightning, having connected details.