Tip 1: How to start programming with Arduino
Tip 1: How to start programming with Arduino
Want to learn how to create electronic gadgetswith your own hands, but do not know where to start? Are you going to study the basics of electronics? Then Arduino boards are the best choice for a beginner. In particular, the Arduino UNO board is good for these purposes.

You will need
- - Arduino UNO board,
- - USB cable (USB A - USB B),
- - Personal Computer,
- - Light-emitting diode,
- - Resistor 220 Ohm,
- - a pair of wires 5-10 cm,
- - if available - breadboard.
Instructions
1
Connect the Arduino board using the USB cable to the computer. The green ON LED on the board should light up.

2
Download the Arduino development environment for youroperating system (supported by Windows, Mac OS X, Linux) on the page http://arduino.cc/en/Main/Software, you can installer, you can archive. The downloaded file also contains drivers for Arduino boards.
3
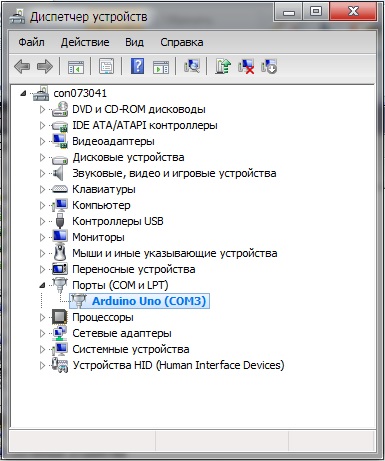
Install the driver. Consider an option for Windows. To do this, wait for the operating system to prompt you to install the driver. Refuse. Click Win + Pause, start Device Manager. Find the "Ports (COM & LPT)" section. You will see the port with the name "Arduino UNO (COMxx)". Right click on it and select "Update driver". Next, select the location of the driver that you just downloaded.
4
The development environment already contains many examples for studying the work of the motherboard. Open the Blink example: File> Examples> 01.Basics> Blink.

5
Specify the development environment for your payment. To do this, on the Tools> Fee menu, select "Arduino UNO".

6
Select the port to which the Arduino card is assigned. To find out which port the board is connected to, start Device Manager and look for Ports (COM & LPT). The number of the port will be indicated in parentheses after the name of the card. If the card is not listed, try disconnecting it from the computer and wait a few seconds, reconnect.
7
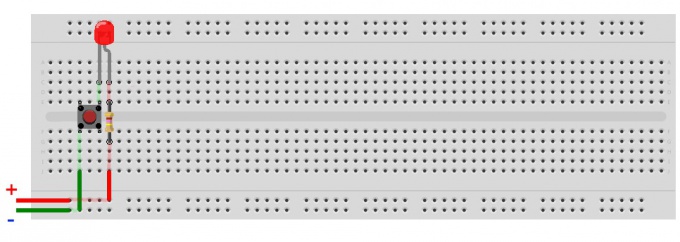
Disconnect the card from the computer. Assemble the circuit as shown. Note that the short LED foot should be connected to the GND terminal, long through the resistor with the digital pin 13 of the Arduino board. It is more convenient to use the breadboard, but if you do not have it, you can wire the wires together. Important note! The digital pin 13 already has its resistor on the board. Therefore, when connecting the LED to the board, an external resistor is not necessary. When connecting the LED to any other conclusions Arduino use of a current-limiting resistor is mandatory!

8
Now you can load the program into the memory board. Connect the card to the computer, wait a few seconds for the card to initialize. Click the "Download" button, and your sketch will be written into the Arduino card's memory. Programming under Arduino is very intuitive and not at all difficult. Look at the image - there are some explanations in the comments to the program. It's enough to deal with your first experiment.

9
The LED should start to wink at you with a periodicity of 2 seconds (1 second lit, 1 off). Your first sketch is ready!

Tip 2: How to learn how to program
Programming attracts and interests manymodern people, especially young and beginners, who are just starting to choose their future profession. They often face the question - where to start in the study of programming? If you decide to learn how to program, do not make a common mistake - do not just go for complex systems and languages (for example, C). Starting with a too complicated language, you can form a wrong impression of programming in general. Beginners are encouraged to work with the simplest systems - for example, learn how to write programs in BASIC. Studying this language will make it possible to achieve good results in a short time. It's not difficult to learn PureBasic - this universal compiled language, which has ample opportunities, will help you understand the basics of programming and improve your skills in the future.

Instructions
1
Install PureBasic on the computer and run the program by opening the IDE editor. To Russify the program, download the crack and download it to the program by checking the settings section responsible for the language.
2
To write a simple program in PureBasic, paste the following line into the editor window: MessageRequester ("Title", "Text")
3
After that, select the "Compiler" section in the menu andclick "Compile". You will see a window with a text button called by the MessageRequester command. To learn more about each function, hover over it and press F1.
4
To create a file that can open on anycomputer, in the "Compiler" section, click "Create exe". Give the executable a name and save it to disk. First, in the compiler menu, select the "Compiler Settings" section and check the support for the WindowsXP style.
5
To create a window application, type ineditor the following code: OpenWindow (1,200,250,200,50, "Window", # PB_Window_MinimizeGadget) CreateGadgetList (WindowID (1)) TextGadget (2,70,16,180,15, "Text string") Repeat Event = WaitWindowEvent () Until Event = # PB_Event_CloseWindowEnd
6
You will see a simple application window open. The first function of the OpenWindow code created the window directly, and the numbers indicate its identifier and position relative to all edges of the screen. The fourth number is the width of the window, the fifth is the height of the window. In quotation marks, you see the text that appears inside the window. The Event_CloseWindow and End command will exit the program.
7
In order to create a program with a screenclick the button that you can click, enter the following code: OpenWindow (1,0,0,200,90, "Window title", # PB_Window_MinimizeGadget | #PB_Window_ScreenCentered) CreateGadgetList (WindowID (1)) ButtonGadget (2,64,30,80,25, "Button") Repeat Event = WaitWindowEvent () Gadget = EventGadget () If Event = # PB_Event_Gadget And Gadget = 2 MessageRequester EndIf Until Event = #PB_Event_CloseWindowEnd
8
The commands here mean the same as inthe above code. If and And are commands that make it possible to press a button. EventGadget is the command that returns the gadget identifier of the event that occurred, and the If function checks for an event.
9
Also you can create a program that can create files. To do this, enter the code in the editor: If CreateFile (1, "C: Test.txt") WriteString (1, "Text Line") CloseFile (1) EndIf
Tip 3: How to learn how to quickly program
Programming can not be attributed to skills, to masterwhich are simple. In the absence of mathematical talent and constant work on the development of their abilities, it is unlikely that you will be able to learn how to quickly program. To acquire this skill will have to make a lot of effort.

Instructions
1
Constantly train the memory. This will help you develop your programming skills - to speed up the process of understanding the requirements and goals of writing, to learn in a short time to generalize the entire array of required information and to consider all possible options to ensure the operability of the finished program. Programmers think in a special way. They try to organize and structure the received data, as soon as possible to carry out the analysis and make conclusions useful for the further work. Solve crosswords and logic puzzles, read books and play chess to strengthen memory and develop the ability to think quickly and productively.
2
The best way to learn how to quickly program -this is a constant practice, even if the knowledge in this area is very modest. Begin by writing basic, easy programs. Valuable experience and the ability to apply knowledge in practice are impossible without repeated trials and correction of one's own mistakes. Then learning to be able to quickly program will yield qualitative results. Even a qualified specialist with a long work experience is required to constantly improve the productivity of his own work and speed up the process of writing programs.
3
Enjoy the experience of colleagues. Communication with other programmers is also a kind of training. Practical training is much faster than studying theory alone. Consult with them about rationalizing the programming process, read their programs and discuss writing your own. So you will learn about the nuances of programming much more and learn how to program faster. In addition, the advice of colleagues helps to improve and look at their own mistakes from the side, which is very useful for development.
Tip 4: How to program the Arduino Pro Mini with the programmer
In the life of a beginning arduinshchika, sooner or laterthere comes a time when you want to save on the size of your product without sacrificing functionality. And then Arduino Pro Mini - an excellent solution! This board due to the fact that it does not have a built-in USB-connector, and one and a half times less Arduini Nano. But in order to program it, you will have to purchase an additional - external - USB-programmer. About how to "pour" the written program into the memory of the microcontroller and make Arduino Pro Mini work, and will be discussed in this article.

You will need
- - Arduino Pro Mini;
- - a computer;
- - USBASP-programmer;
- - connecting wires.
Instructions
1
First a couple of words about the programmer. Buy this can be for $ 2 in any Chinese online store. A USB-A type connector is used, of course, to connect the programmer to a computer. The ISP connector is needed to connect to the programmable board. The JP1 jumper monitors the voltage on the VCC pin of the ISP connector. It can be 3.3V or 5V. If the target programmable device has its own power source, you need to remove the jumper. JP2 jumper is used for flashing the programmer itself; This article is not considered. The jumper JP3 is needed if the clock frequency of the target device is below 1.5 MHz. Two LEDs indicate: G - power is supplied to the programmer, R - the programmer is connected to the target device.

2
Connect the programmer to the USB port of the computer. Most likely, after some short time the operating system will report that it could not find the driver for this device. In this case, download the driver for the programmer from the official site http://www.fischl.de/usbasp/. Unzip the archive and install the driver in the standard way. The USBasp programmer should appear in the device manager. The programmer is now ready for use. Disconnect it from the computer.

3
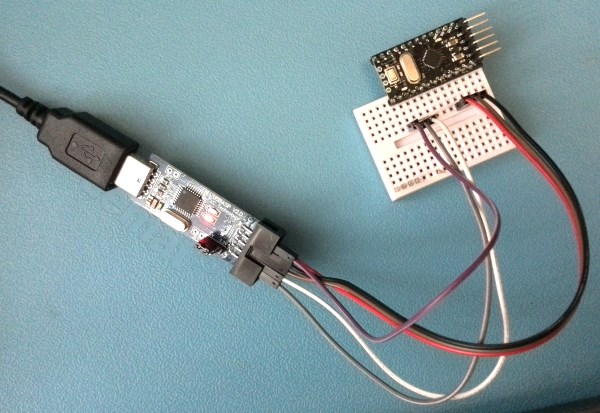
Next, you need to connect the Arduino Pro Mini card with the programmer. The above diagram shows how to do this.

4
We will use the breadboard and connecting wires - it will be fast and reliable. We connect the programmer connector to the terminals on the Arduino Pro Mini according to the above diagram.
5
We open the development environment of Arduino IDE. Select the desired board through the menu: Tools -> Board -> Arduino Pro or Pro Mini (Tools -> Board -> Arduino Pro or Pro Mini). It is also necessary to select the type of microcontroller, which is set in the Tools -> Processor menu. I have this ATmega 168 (5V, 16 MHz). These parameters are usually written on the microcontroller body.

6
Choose the type of the programmer: Tools -> Programmer -> USBasp (or Tools -> Programmer -> USBasp).

7
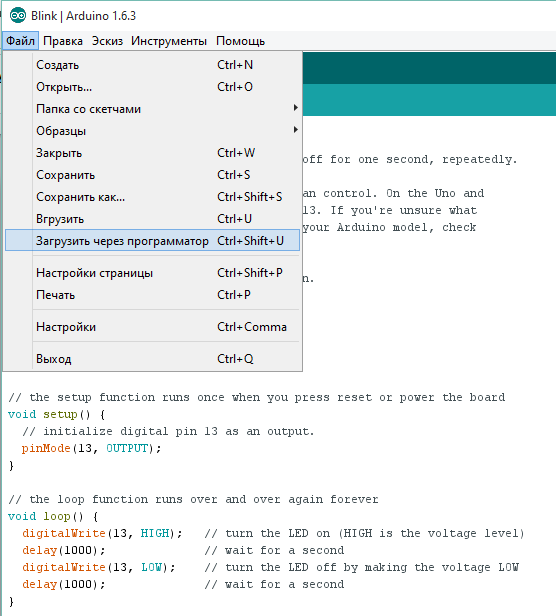
Open the sketch we want to load into memorymicrocontroller. For example, let it be a flashing LED: File -> Samples -> 01. Basics -> Blink. We connect the programmer with the Arduino Pro Mini connected to it. Now, in order to load the sketch in Arduino with the help of the programmer, you can proceed in several ways. 1) From the File menu -> Download via the programmer, 2) using the keyboard shortcut Ctrl + Shift + U, 3) holding down the Shift key, press the right arrow button, which is usually used to load the sketch into Arduino memory in the standard way. All, the program is "plugged" into the memory of the microcontroller.
Tip 5: How to program avr
The easiest way to learnprogramming of AVR series microcontrollers is the use of Arduino hardware platform. The software shell of this platform supports Linux, Android and Windows operating systems.

Instructions
1
Purchase a complete Arduino card or any of itsnumerous clones. The clone will bear any other name. If desired, assemble any of these clones yourself using any of the following AVR family microcontrollers: ATmega8, ATmega168, ATmega328. If the computer does not have a COM port, be sure to provide a USB-COM converter on the board or use a ready external converter. In all cases, do not forget about the level converter, because COM-ports of computers usually work at a voltage of 12 V, and the microcontroller requires 5 or 3.3.
2
Program the microcontrollerArduino firmware, if this was not done initially (for example, in the finished board). It will take only one time to write the firmware to the microcontroller, in the future the programs you develop will be written to it via USB or COM-port without using the programmer. They will be launched on top of it in the same way as programs run on top of the operating system on the computer.
3
If your computer does not have a Java virtual machine, download and install it.
4
Download and install the official integratedthe Arduino development shell. This program, located on the official website of the project, is compatible with both the original Arduino boards and their unofficial clones.
5
Connect the card to the computer and then power it on.
6
Run the shell. Select the type of card in it. If it is not original, select the card with which it is compatible. Also select the port to which it is connected.
7
See the examples attached to the shell. They are written in a special programming language called Wiring. Try to write them in turn to the microcontroller located on the board, and start.
8
After examining the examples, try to start compilingown programs. If necessary, equip the board with additional peripherals. Being programmed, in the future it will be able to work autonomously without a computer.
Tip 6: How to learn to program from scratch
If you want to create video games, applicationsfor smartphones or internet sites, you need to learn how to program. There are countless different programming languages, but all of them, as a rule, have general principles of work.
Define your goal
Learning a programming language is prettyan interesting lesson, but before you start the learning process you need to clearly articulate the goal. For what purpose do you need knowledge of the programming language? Perhaps you want to become a web-programmer, developer of flash-games or write applications for the iPhone.Select the programming language
Programming is recommended to beginfrom C #. These are the basic languages, they represent a certain industry standard of programming, their knowledge is considered compulsory for any professional programmer. Do not start your training with programming languages like Java. Their syntax may seem too confusing to you. The C # languages for some novice programmers can be too complex, in which case you can begin your training with Python, which is also a good foundation for beginners. It may take you about a year to learn the basics of programming. You will learn the features of procedural and object-oriented programming, the principles of working with binary trees, arrays, lists, etc. Only after studying the basics go to more complex tasks.Visit websites of developers of programming languages, study the documentation. Be sure to communicate on the forums of programmers, they, as a rule, answer most of the questions of beginners.
Mathematics
If you want to learn how to program, youjust need to know the math. In the process of work you will face a lot of problems that can not be solved without knowing the basics of this science. There are a lot of mathematical equations, systems and theories (Fourier series, Fibonacci numbers, etc.), which greatly simplify the programming process.Training does not end
The evolution of programming languages is notplace, their development is constantly. Try to read as much literature as possible about the area of programming in which you plan to work. Always look for alternative solutions to emerging problems, this will help you to constantly improve the effectiveness of the generated code. Talk with professional programmers, they can always advise how to cope with a particular problem. Reading the codes of their programs will also bring you great benefits.It is impossible to keep everything in mind all the time. Do not hesitate to use the reference books on programming languages.The tasks of programming, no matter how simple they arenor were, never hesitated with a swoop. They always require the development of the correct algorithm of actions, effective in this particular situation. The search for optimal algorithms requires constant practice and training. Try to solve small programming problems more often (you can find them on specialized websites), this will help you to gradually sharpen your skills in this area.
Tip 7: How to learn how to program in Delphi
Delphi is one of the most famous andpopular programming languages. It is very clear and understandable, it is convenient for quickly writing the necessary programs. You can learn the basics of programming on it in a very short time.

Instructions
1
Object-oriented programming languageDelphi is based on Object Pascal. Borland has significantly improved it, created a convenient programming environment Borland Delphi. It was this environment that provided Delphi so much popularity. Begin programming with it can even beginner, in the course of creating the program mastering the basics of the language.
2
For work you will need a programming environmentBorland Delphi 7, you can find it on the network. Download the program, install. After the startup, you will see the Form1 form - this is the workpiece of the future application's interface. At the top of the program window there is a palette of components, you can simply drag them to the form with the mouse. So you can create buttons, text boxes and much more.
3
Dimensions of the shape, like the buttons, can be changed. Specify the shape you need to size by simply dragging its edges with the mouse. Give the buttons names. To do this, select it and in the left part of the window, in the Caption line, enter the desired text. Similarly, you can change the names of any items.
4
By pressing the green arrow, you run the createdprogram and you can see how it will look. But the buttons will not work yet. In order for them to perform their functions, write event handlers for them, that is, specify what should happen when the button is clicked.
5
Close the running program, then twiceclick any button on the form. The code editor window opens, and you need to enter the required line in it. Which exactly depends on what should happen when the button is pressed. It is at this stage that you will have to pick up the Delphi tutorial and begin to learn the actual programming, that is, the writing of the code.
6
The most convenient way to learn Delphi on specificexamples. Here you can download the illustrated primer: http://gluk.webhost.ru/programs/delphi7.chm. On this page you can watch a video about creating a simple text editor on Delphi: http://wda.3dn.ru/blog/videourok_po_borland_delphi_7_delaem_tekstovyj_redaktor_v_borland_delphi7/2011-03-17-2.
7
It is important not only to learn how to use BorlandDelphi and be able to write the right code. It is necessary to get used to the right programming style from the very beginning, this is very important. First, determine which program you need, what it should do, what interface it should have. Then create an algorithm for its work, that is, write down the points on what should be done and how. A well-designed algorithm will save you a lot of time and will create a good program.
8
The finished algorithm must be translated into the languagecode. Be sure to insert comments into the code, otherwise you will be able to figure out the code of the program in a while. Therefore, do not spare the time for comments, when you compile the program they are still deleted and will be present only in the source code.
9
Always insert error handlers into the code -the program must know what to do in case of any failure. If the error handler is not present, the program terminates abnormally with the appearance of the corresponding window.
10
Be sure to test the program for variousabnormal situations. Do everything that a user can do with it. Find bugs and fix them. Only after the program has been thoroughly tested, you can transfer it to users.
Tip 8: How to program
Programming Automatic telephone exchange - the task is not simple and requires special knowledge andskills. To avoid malfunctions and as a consequence - downtime, it is recommended to contact a specialist. As a rule, PBX programming is taught at specialized courses organized by the equipment manufacturer. There are general principles and rules, according to which most modern PBXs are programmed.

You will need
- - a system telephone;
- - a computer;
- - USB cable;
- - drive with driver and control program.
Instructions
1
Prepare the equipment for programming. First, connect all city telephone lines to the corresponding ports of the PBX. Usually in the terminology of telephony, such ports are denoted by the letters CO.
2
Connect all internal phone lines to thecorresponding to the PBX ports. These ports are of two types - digital and analog. They are denoted by the letters EXT. Each port corresponds to the internal number 101, 102, 103, etc. Digital telephones are connected to system phones. These phones are usually delivered with the PBX and do not work without it. The obvious difference between a system phone and a conventional analog device is the presence of a large number of lightbulbs in front of the speed dial buttons.
3
Connect the PBX to the computer using a USB cable if the PBX has a USB port. Then install the ATC driver, PBX management program on the computer.
4
If a USB port is available, program the PBX from thecomputer. To do this, run the PBX management program. Specify the USB port on which the PBX will be programmed. Then connect to the PBX by entering the password for the programming and the password for the input. The default password is 1234.
5
If there is no USB port, program the PBX withthe system telephone. In order for the phone to have programming rights, it must be connected to the EXT1 port, which corresponds to the number 101. To enter the programming mode, press the "Program" button, and then dial the "star" or "grid" combination on the phone's numeric keypad. You will be prompted for the connection password. Here the standard password is 1234.
6
After logging in, be sure to configureThe main functions critical for system operability. First, set up a numbering plan. Here subscriber names are registered and their correspondence to internal numbers. To do this, in the "Name" column next to the extension number, enter the desired name that will be displayed on the proprietary telephone.
7
Set up city lines. It is necessary to set the tone or pulse mode of the lines. This is necessary to make calls from the automatic telephone exchange by city lines. To do this, select the appropriate line mode from the "Dial Mode" drop-down menu.
8
Configure the distribution of incoming calls. In accordance with the distribution table, these or other internal telephones will ring. By default, all phones call when called on any city line. To do this, put the daws in the table in the column of the extension number and indicate after what time from the beginning of the call the device should start to call.
9
To save the settings, click the "Apply" button when programming from the computer or the Store button when programming from the proprietary telephone.
10
When you're done, close the program and turn it off.USB cable if the PBX is programmed from a computer or press the Program button to exit the programming mode if the PBX is programmed from the phone.
Flashing LED
