Tip 1: How to fix the thread when sewing with a cross
Tip 1: How to fix the thread when sewing with a cross
The quality of the cross-stitch embroidery,is determined not only by the evenness of the stitches on the front side, but also by how neatly the inside looks. Experienced needlewomen do not make knots to make the work smooth.
You will need
- - a needle with a wide eye;
- - scissors.
Instructions
1
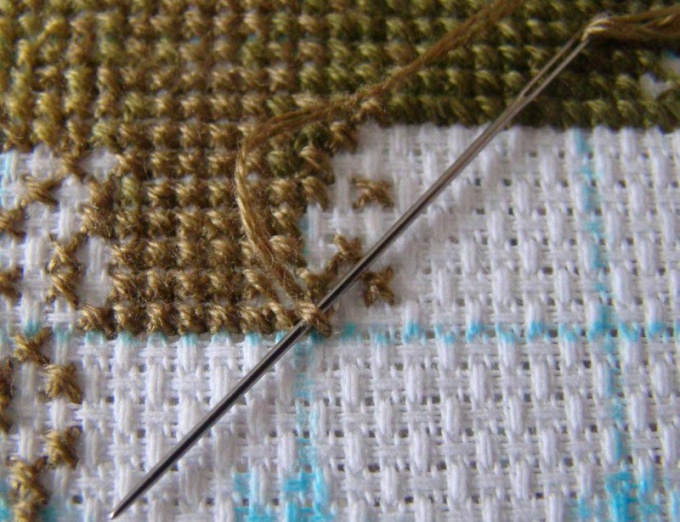
Even number of threads embroidering If workperformed in 2, 4 or 6 additions to a floss, it is worthwhile mastering an uncomplicated, uncoated technique, which is useful when laying other types of stitches, for example, a stitch. Cut the mulina about 2 times longer than you used to apply in work. Insert a thread into the eye of the needle 1, do not tie a knot. Find the place on the fabric where the first stitch will begin, pick up the weave of the canvas. Bring out the needle and pull out the thread. On both sides of the weave canvas, there are now two ends of a floss. Carefully align them, insert both in the eye of the needle and get down to work - make the first stitch of the cross.
2
Embroidery with an odd number of threads This techniquefastening is used mainly when working with a cross, it is difficult to apply when decorating other stitches. If the work is performed in an odd number of additions, you need to cut off the floss with a margin of 7-10 cm, separate the desired number of threads and insert into the eyelet. Find the place where you want to start embroidering. Insert the needle into the desired cannula hole from the wrong side, pull the thread to the front side. Do not forget to leave a tail of 7-10 cm on the back, gently hold it with your fingers, holding the embroidery frame so that it does not get tangled in the stitches. When enough crosses are done, leave the work thread on the front side, turn the work over. Pull the tail into the eye, insert the needle into the weave thread and pull it out. Remnants of the mulina. To secure the thread securely, several turns can be made.
3
Fixing the thread at the end of the work When the threadends, or a section of a certain color is completely embroidered, it is necessary to bring the needle to the wrong side. Carefully pull up the mulina, enter the needle of the weave, pull it out. If necessary, stroke one of the stitches several times.
Tip 2: How to fix the thread when embroidering
When embroidery it is necessary to fix a thread, but such a nodule as in sewing, for embroidery is unacceptable. Nodes can deform the fabric, stretch it or make it bumpy. When thread stitches can cling toNodes, and the ability to dissolve an incorrectly made pattern you will no longer be. The tip of the thread must be fixed at the beginning of the work and as the thread ends. Experienced craftsmen have several ways of fixing the thread.

You will need
- - Embroidery needle;
- - thread;
- - embroidery frame.
Instructions
1
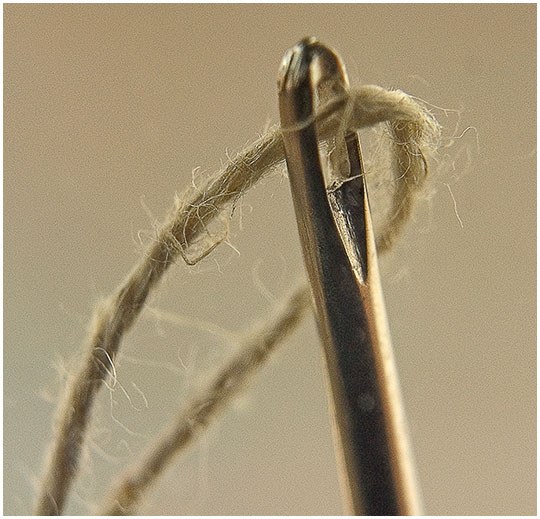
The way "loop". Suitable if the number of threads involved is even. For example, when working with a threadin two pieces, cut off the single a thread longer than twice as long as you normally woulduse. Fold it in half and thread two trimmed tips into the eye of the needle. At the opposite end of the thread, a loop will form. Tap the needle from the wrong side and stretch the thread so that the loop remains on the underside. Pierce the fabric from the front side and thread the needle through the loop on the wrong side. Pull the thread. Binding was obtained.
2
When Work with an odd number of strings can be applieda thread way "without a knot". Inject the needle into the tissue 1-2 cm from the beginning. Leave the tail of the thread free. When you start embroidering, make sure that the stitches (crosses) block the free tail of the thread. After the stitches are made, the remaining tip is simply cut. The stitches will securely hold the end of the thread.
3
Method "with a knot". This method differs from the above only in that a temporary knot is tied at the tip of the thread. He does not let the thread run away when the embroiderer's hand moves abruptly. After the tail is fixed, unfasten the knot. Take care that the knot does not end up under the stitches.
4
With an odd number of threads, you can fix the tip by making a few small stitches on the canvas, which then overlap with the main pattern. Stitches make small and close them a threadthe same color.
5
If the stitches do not block the tip of the thread or you forget about it, you can fix it a thread, having passed it on the wrong side under already executed stitches. The tail must pass at least under five crosses. If a thread rather slippery and runs away from under the stitches, you can flip it around the second or third stitch.
6
As soon as a thread fixed, all crawling tips cut offtight to the fabric. This will not let the wrong side to the end of the embroidery fluff like a terry towel. Also shaggy ends will not get out on the front side when the needle is punctured next to them.
Tip 3: How to fix the thread when embroidering with a cross
Quality of embroidery cross is determined not only by the evenness of the crosses laid, but also by the appearance of the wrong side of the work, by the absence of knots on it and by the way the remaining thread is secured.
Instructions
1
Learn the technique of embroidery cross without nodules. It can be use, if you use an even number of threads of floss or wool in 2 pieces. If you embroider on canvas type Aida and according to the instruction crosses are performed thread mulina in 2 pieces, thread 1 thread of the desiredhue in the needle. Do not tie a knot. Determine the interweaving of the canvas where you need to start embroidering. On the front side, insert the needle into the material, grasp 1 thread in the weave, pull the needle to the front side. Pull the moulin out of the needle, tighten the ends of the thread so that they become the same length on both sides of the grip. Pull both ends into the eyelet and start embroidering.
2
Finish the embroidery, hide the rest of the thread. To do this, bring the needle and thread to the wrong side, tighten so that on the front side the last stitch is flat. Insert the needle into the stitches formed on the wrong side, pull the needle and thread behind it. The length of the hidden thread should be at least 1-1.5 cm. If you are embroidering a picture or a pillow, this will be quite enough. If your work - a napkin, dressing or something else that requires regular washing, swirl one of the stitches of the inner side or weave the canvas several times and re-hide the thread. Cut the end as close to the material as possible.
3
Use the technique of fixing threads in stitches,if you use an uneven number of threads in embroidery. Before you start, put the needle in the right place, leave the tail of 6-8 cm from the wrong side, do not tie a knot. make the first few stitches, holding the tail, so that it is not entangled and not sewn inadvertently. When enough crosses have been made, leave the working thread on the front side, thread the tail into the needle and hide it in stitches. Cut the remainder as close as possible to the canvas.
Tip 4: How to start with cross stitching
Embroidery cross - Perhaps the most popular type of embroidery. It does not require special skills and is easy to perform. Not even invent plot - it is enough to take the ready liked scheme.
You will need
- -canvas;
- -the floss of a moulin;
- -tools;
- -needle;
- -scissors;
- -Circuit of drawing
Instructions
1
First, choose a pattern for embroiderycross. A scheme of modest size with a small number of stitches and colors is suitable for beginners. After doing a simple job, you will get minimum skills and decide whether you like this activity in principle and whether you want to continue. Of course, if you are determined to immediately execute a large exquisite picture, it will be more interesting. But you will need a lot of skeins of threads of different colors and a lot of patience, because such work can take more than one month. Ask yourself if you are ready for this.
2
Having decided on the pattern and the scheme, stock upnecessary materials. Get the right amount of thread for the mulina of the corresponding colors. Buy the threads of one company to make the picture look homogeneous and harmonious (threads of different firms can vary in thickness and appearance). If you can afford it, choose good quality threads from a prestigious manufacturer. So your picture will be preserved for a long time, and the colors will remain bright and saturated. cross can be performed on ordinary tissue, but usuallyfor her use the canvas. This is a through mesh fabric, linen or cotton. Scissors use small ones - they are more convenient. Get stupid needles on the end with an elongated eyelet, they are usually sold as needles for embroidery. For convenience, prepare the embroidery frame in which the fabric is fixed and stretched during operation. They are wooden and plastic, round and oval. Some can later be used as a frame. If you do not want to spend time searching for the right fabric and thread, purchase a ready-made set for embroidery cross - there will already be a canvas of the right size, and threads of the right colors and length.
3
Proceed to embroidery. Leave a few centimeters of the canvas with eachThe sides of the drawing, so that you can then insert the work into the frame. Select the item you'd like to start with (although beginners are often advised to start from the center). Take the thread of the desired color, it is usually doubled. Take the thread twice as long as the required length, fold in half, insert the needles into the eyelet with tips. To fix the thread on the fabric, poke the center of the canvas cell, pull the thread and insert the needle into the folded end of the thread. Thus, the fastener location remains invisible. A simple cross consists of a stitch forward and a stitch back. Pass the thread from left to right diagonally, on top of two threads of the canvas. Insert the needle under the double transverse thread vertically. Going back, make the same stitch from right to left. The resulting two stitches - this is the simple cross. When the thread ends, fix it on the back of the embroidery and skip under the last few stitches.


