Tip 1: How to make a funny turntable
Tip 1: How to make a funny turntable
Funny flip-flop is similar to flexagon, but hasthe volume form. Turning it around with simple finger movements makes it easy to give different forms of form, which causes surprise and admiration in others, as in the demonstration of tricks, but there are no secrets and no skills are required. We only need a funny turncoat.

You will need
- Thick sheet material or colored cardboard;
- thin cloth or scotch tape;
- adhesive for fabric and sheet material.
- Tools: pencil, ruler, scissors.
Instructions
1
Cut out of sheet material (cardboard)rectangular and square billets in quantity of: 16 pcs. the size of 3x3 cm; 16 pcs. the size of 3x4 cm; 16 pcs. 3x5 cm in size. We cut out 28 squares of 3x3 cm and 4 rectangles of 3x5 cm from a thin fabric.

2
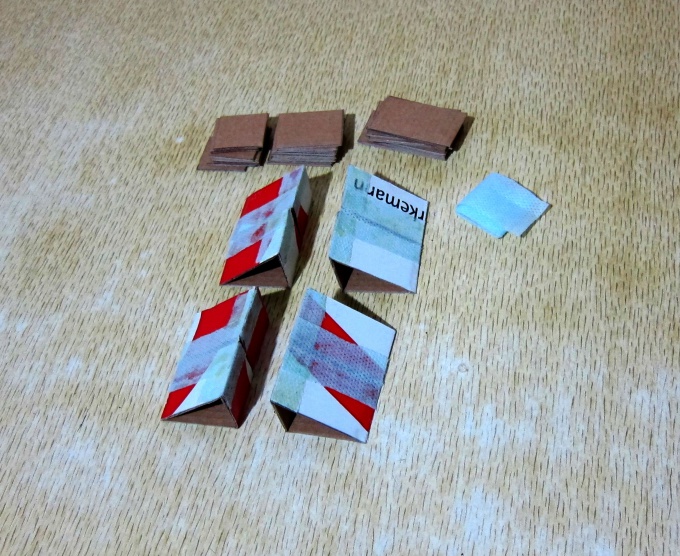
Taking one piece of 3x3, 3x4, 3x5 cmglue them with a cloth 3x3 cm. We get a triangular ring with sides 3x4x4 cm, 3 cm high. If cardboard is used, it is possible to cut out a piece of 3x12 cm, make fold lines 3 and 4 cm from the edge, bend along the fold line into a triangle, and join the joint scotch tape. Repeat this 8 times and get 8 single triangular rings glued together with a cloth or tape in the corners from the outside of the rings.

3
Using a 3x5 cm cloth or an adhesive tape, glue togetherpairwise triangular single rings along a face of length 5 cm. We obtain 4 double triangular rings. The rings must be movably attached externally to the longest sides of the triangles.
4
Using a 3x3 cm cloth or adhesive tape, glue togetherpairwise double triangular rings along a face of length 3 cm. We obtain 2 chains of triangular rings with 4 links. The rings should be movably fastened on the side at 3 cm. The sides of 5 cm of all rings of each chain should be facing in one direction.

5
The resulting two chains of 4 triangular rings,by aligning each in the form of a trihedral tube, we apply 4 cm facets to each other, and on top of the 3x3 faces using 3x3 cm cloth or adhesive tape we glue two chains into a single ring along the two outer rings. We obtain a single chain of 8 movable triangles.

6
On each face of all triangles we gluePreforms of sheet material of appropriate size over the connective tissue. This will hide the connective tissue, will give the product more rigidity to the triangular links and the strength of the entire change-over.

7
After the glue dries, we take twohands and begin to bend it along the moving corners, folding and stretching in different directions without using great efforts. The changeling must be amusing to rotate by changing the shape in a bizarre way.
Tip 2: How to make a postcard-flipchart
It is always pleasant to receive gifts, but it is even more pleasant to give gifts. Just imagine how much joy you can present to your native person, giving him a small present made by yourself.

You will need
- - thin cardboard;
- - colored paper;
- - scissors;
- - pencils or markers;
- - Scotch tape.
Instructions
1
To make a card-changer, take a sheetthin cardboard, it can be white cardboard or colored, at your discretion. On the wrong side, draw a rectangle 280 x 140 millimeters, divide it into four equal vertical rectangles, but do not cut it yet. Draw the fold lines as shown. On the fold lines, lightly scissor to make them bend better.

2
Cut a large rectangle into fourSmall and fold them along the fold lines, then unfold. Take two rectangles, put them on the table face-to-face with each other. The line of contact of the rectangles must be vertical.
3
When you have a square from two rectangles, take a double-sided scotch, cut four pieces, no larger than 30 by 30 millimeters. Stick adhesive tape over the corners of the square.
4
Next form another square of tworemaining rectangles. Put the rectangles face up, the connection line should be horizontal. Cut the double-sided adhesive tape again and glue it to the corners in the same way.

5
Carefully take the two resulting squares and byqueue the rectangles of one square to the rectangles of another square. Carefully twist the card-changer in your hands, if you feel that somewhere is jammed, cut off excess. The basis for a postcard-turncoat is ready.
6
Now you can do it yourselfapplication for your postcard. You can make it from colored paper or colored cardboard, beautiful fabric, satin ribbons. Decorate the card can be sequins, beads. If you want to make a truly original and amazing postcard, make on it a composition of natural materials, it can be petals of flowers, small feathers, foliage, blades and even moss.
7
Doing an application, master one simple rule - in no case do not glue the materials on the fold line.
8
The postcard is ready for change! Before you give it, do not forget to write your best wishes. Such a small gift is sure to please your close friend, because you made this card with your own hands, with your soul.
Tip 3: Pie-pie from pears and ginger
Desserts and pies with the addition of pears orcompletely from the pear have always a gentle and unobtrusive taste. This pie is no exception. An unusual little mint flavor of a pear in combination and ginger will appeal even to those who do not like sweets.

You will need
- - 120 g butter butter;
- - 50 g of brown sugar;
- - 150 g of flour;
- - 1 tsp. ground ginger;
- - 0.25 tsp. ground cloves;
- - 0.25 tsp. nutmeg ground;
- - 3 chicken eggs;
- - 80 g of honey;
- - 1 tbsp. ginger fresh grated;
- - 1 tsp. soda.
- To make the filling, take:
- - 5-6 pears;
- - 2 tablespoons butter;
- - 2 tablespoons Sahara;
- - 2 tablespoons juice of fresh lemon;
- - 6 tablespoons. cognac, you can brandy.
Instructions
1
To begin with, you need to peel off the skin with pears, then cut out the core with bones. Prepared pear cut into small pieces and pour each piece a few drops of lemon juice.
2
1 tbsp. sugar and 2 tbsp. butter cream should be put on the pan and dissolve, stirring, on a small fire. Next, the prepared pears should be fried until they bloom, from all sides.
3
Pears toasted off the frying pan and put ona plate. Then in the same frying pan pour brandy or brandy and some unused sugar. This mass is cooked until it is similar in its consistency to syrup.
4
The shape, whose diameter is 24-26 cm, grease with oil and pour into it the resulting syrup. Then shift the pears into one layer.
5
In order to make a dough, you need sugar and butterBeat thoroughly. In the prepared mass, one should add eggs one at a time, while still whisking. Ginger is fresh and honey is added there and mix everything. Mix flour with spices and soda and gradually add to this mass. Mix everything, make the dough thick.
6
With a ready test, pour the pears in the form. Preheat the oven to 180 degrees. Put the form with the pie in the oven and bake for 40 minutes.


